Python Exemplary
deutsch     english    

SWITCHES & BUTTONS, DIGITAL OUTPUT

The source code of all examples can be downloaded from here.


Introduction


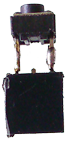
Switches and push buttons are very common input devices for microprocessor systems. They can be considered as digital sensors with two states. Depending on the concrete situation the states are named off/on, pressed/released, Low/High, False/True, 0/1, 0V/3.3V, etc. Despite a switch is the most basic sensor to be connected to the GPIO header, the handling the handling is not straightforward due to the following reasons:

  • A GPIO input should never be "undefined". This happens when the input pin is left "open", e.g. is not connected to a voltage near 0V or near 3.3V (logical 0, logical 1).
First in mind to solve the problem is a changeover switch connected to GND and VCC.  
But this not really a good idea because when the switch changes from one position to the other, the output remains open for a short while.
  • The solution is to use a resistor that "pulls" the GPIO-input to either logical 0 or 1. In most cases its value is in the order of 10 kOhm (not smaller to avoid too much current to flow).
 
Pull-up resistor
 
Pull-down resistor
  • But another problem emerges: When the switch touches the GND (for pull-down) or the VCC (for pull-up) contact, generally it "bounces" back to the open state one or several times until the contact is closed completely. Bouncing may also happen, when the switch opens: it may bounce back to the closed state one or several times, even if bouncing when the switch opens is less frequent. Switch bouncing effects may be eliminated by hardware using a flip-flop or by software by disabling the detection of switch state changes for a short while (in the order of 10 - 100 ms). (For more information about switch bouncing, see here.)

    Because electronic circuitry mostly use pull-up resistors, we prefer this kind of wiring. The pull-up/pull-down resistor may be part of the input stage of the microprocessor system as it is the case for the Raspberry Pi. Here each GPIO input may be set-up by software with a pull-up/pull-down or no input resistor (called "floating input").

    hand1

    Keep in mind, the negative voltages and voltages over 3.3V may destroy the system. So never connect a switch to the 5V voltage source and make sure that no other external device connected to the GPIO delivers more than 3.3V.


Experiment 1: Detecting the state of a push button
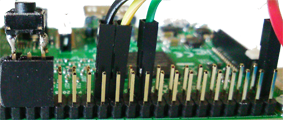
 

Aim:
Connect a push button to the GPIO and detect its state. When the button is pressed, the LED and/or the buzzer are turned on; they are turned off, when the button is released.

Circuitry:
Use a breadboard and realize the following wiring. Be careful not to confuse the 3.3V and the 5V DC outputs (3.3V is at pin #1, 5V is at pin #2). You may omit the active buzzer, but it is much more fun if you have one. Wiring depends on the model you use (GND, +VCC, Signal). Some model needs 5V to work. Take it from GPIO pin #2. The LED must be inserted with proper polarity (but it is not destroyed if reversed).

Program:[►]

# Button1.py

import RPi.GPIO as GPIO
import time

# Button pin
P_BUTTON = 40 # adapt to your wiring
P_LED = 22  # adapt to your wiring

def setup():
    GPIO.setmode(GPIO.BOARD)
    GPIO.setup(P_BUTTON, GPIO.IN, GPIO.PUD_UP)
    GPIO.setup(P_LED, GPIO.OUT)

setup()
while True:
    if GPIO.input(P_BUTTON) == GPIO.LOW:
        GPIO.output(P_LED, GPIO.HIGH)
    else:
        GPIO.output(P_LED, GPIO.LOW)
    time.sleep(0.01)
Highlight program code (Ctrl+C copy, Ctrl+V paste)

Remarks:
You must always insert a serial resistor when connecting a LED to the GPIO, since the maximum allowed current is about 5-15 mA (consult the datasheed). Like with any ordinary semiconductor diode this happens when the voltage is in the 0.7-1V range. Do not use a "narrow" loop, because you waist a lot of processor time. Here the processor is allowed to "sleep" for 10 ms (0.01 s).

The running program must be "killed" by terminating the Python process. You can do this in a Linux shell by typing sudo pkill python. With TigerJython or Geany the process is automatically killed when the next program is downloaded (see Development Tools for more information).

Many applications are controlled by pushbuttons, especially to terminate gracefully. We recommend to solder a small switch to a female header in one or two GPIO pin distance. You plug it anywhere between a GND and a GPIO I/O pin.

switch7

switch5switch6


Experiment 2: Switch state while pressing the button


Aim:
When the button is pressed, the LED and buzzer are turned on; when the button is pressed again, they are turned off.

Circuitry:
Same as above.

Program:[►]

# Button2.py

import RPi.GPIO as GPIO
import time

P_BUTTON = 40 # adapt to your wiring
P_LED = 22    # adapt to your wiring

def setup():
    GPIO.setmode(GPIO.BOARD)
    GPIO.setup(P_BUTTON, GPIO.IN, GPIO.PUD_UP)
    GPIO.setup(P_LED, GPIO.OUT)
    
setup()
isLedOn = False
isButtonReady = True
while True:
    if isButtonReady and GPIO.input(P_BUTTON) == GPIO.LOW:  # pressed
        isButtonReady = False
        if not isLedOn:
            isLedOn = True
            GPIO.output(P_LED, GPIO.HIGH)
        else:
            isLedOn = False
            GPIO.output(P_LED, GPIO.LOW)
    if GPIO.input(P_BUTTON) == GPIO.HIGH:  # released
        isButtonReady = True
    time.sleep(0.01) # remove this line to experience bouncing
Highlight program code (Ctrl+C copy, Ctrl+V paste)

Remarks:
You need a flag isLedOn to store the current state of the LED/buzzer, so you can switch the state when the button is pressed. The second flag isButtonReady informs you, whether the button is released. If you remove the line time.sleep(0.01) the program behaves badly. This is due to the bouncing as explained above. Do you understand, why bouncing programs are eliminated by this time delay?


Experiment 3:Using an event driven button library

  Normally the push button handling is not your main interest. Because button actions may happen any time, they should be handled by events that trigger a callback function (also called an interrupt routine). But programming with interrupts and events require advanced programming skills. We provide an event-driven button handler that supports the standard button events: BUTTON_PRESSED, BUTTON_RELEASED, BUTTON_LONGPRESSED, BUTTON_CLICKED and BUTTON_DOUBLECLICKED using internal threads. Download the module button.py from here and copy it into the same folder as your program. If you stuty the source code or the Python doc, you see that it is a class library and any number of buttons are supported.

Aim:
Detect the following push button events: press, release, long press, click, double-click using a button library. The main program emits a endless beep. When a double-click is detected the program terminates gently.

Circuitry:
Same as above.

Program:[►]

# Button3.py

from button import *
import RPi.GPIO as GPIO
import time

P_BUTTON = 15 # adapt to your wiring
P_LED = 7     # adapt to your wiring

def setup():
    GPIO.setmode(GPIO.BOARD)
    GPIO.setup(P_LED, GPIO.OUT)
    button = Button(P_BUTTON) 
    button.addXButtonListener(onButtonEvent)

def onButtonEvent(button, event):
    global isRunning
    if event == BUTTON_PRESSED:
        print "pressed"
    elif event == BUTTON_RELEASED:
        print "released"
    elif event == BUTTON_LONGPRESSED:
       print "long pressed"
    elif event == BUTTON_CLICKED:
        print "clicked"
    elif event == BUTTON_DOUBLECLICKED:
        print "double clicked"
        isRunning = False
       
setup()
isRunning = True
while isRunning:
    GPIO.output(P_LED, GPIO.HIGH)    
    time.sleep(0.1)
    GPIO.output(P_LED, GPIO.LOW)    
    time.sleep(0.1)
GPIO.cleanup()
print "all done"
Highlight program code (Ctrl+C copy, Ctrl+V pasten)

Remarks:
As you see, the main program executes the blinking and is freed of handling the button. Whenever a button event happens (sometimes one says that events are "fired"), the callback function onButtonEvent() is invoked by the system. It is a golden rule not to execute lengthy code in a callback, because otherwise you block the event detection during this time.To enable the event detection, you must register the callback onButtonEvent by calling addXButtonListener(onButtonEvent).

You should call GPIO.cleanup() before your program terminates to reset the GPIO to its default state. Otherwise GPIO setup options may survive the program termination and cause conflicts for the next program invocation.

If you do not need click and double-click notifications, it is better to use addButtonListener() that takes a callback function that reports BUTTON_PRESSED, BUTTON_RELEASED and BUTTON_LONGPRESSED events only. This eliminates a short delay that is needed to distinguish between click and double-click events.


A nice application for hams: Using the buzzer to emit Morse code


It is simple to create a Morse code generator using the active buzzer. The program shows how you should structure your code to make the program pleasant to read for you and the whole Python community.

Aim:
Play any given text in Morse code, e.g. a "cq call" as radio amateur (ham).

Circuitry:
Same as above.

Program:[►]

# MorseGen.py

import RPi.GPIO as GPIO
import time

P_BUZZER = 22 # adapt to your wiring
dt = 0.1 # adapt to your speed

morse = {
'a':'.-'   , 'b':'-...' , 'c':'-.-.' , 'd':'-..'  , 'e':'.'    ,
'f':'..-.' , 'g':'--.'  , 'h':'....' , 'i':'..'   , 'j':'.---' ,
'k':'-.-'  , 'l':'.-..' , 'm':'--'   , 'n':'-.'   , 'o':'---'  ,
'p':'.--.' , 'q':'--.-' , 'r':'.-.'  , 's':'...'  , 't':'-'    ,
'u':'..-'  , 'v':'...-' , 'w':'.--'  , 'x':'-..-' , 'y':'-.--' ,
'z':'--..' , '1':'.----', '2':'..---', '3':'...--', '4':'....-',
'5':'.....', '6':'-....', '7':'--...', '8':'---..', '9':'----.',
'0':'-----', '-':'-....-', '?':'..--..', ',':'--..--', ':':'---...',
'=':'-...-'}

def s(n):  # wait
    time.sleep(n * dt)

def setup():
    GPIO.setmode(GPIO.BOARD)
    GPIO.setup(P_BUZZER, GPIO.OUT)
    
def dot():
    GPIO.output(P_BUZZER, GPIO.HIGH)
    s(1)
    GPIO.output(P_BUZZER, GPIO.LOW)
    s(1)

def dash():
    GPIO.output(P_BUZZER, GPIO.HIGH)
    s(3)
    GPIO.output(P_BUZZER, GPIO.LOW)
    s(1)

def transmit(text):
    for c in text:
        if c == " ":
            s(4)
        else:
            c = c.lower()
            if c in morse:
                k = morse[c]
                for x in k:
                    if x == '.':
                        dot()
                    else:
                        dash()
            s(2)

setup()
transmit("cq de hb9abh pse k")
GPIO.cleanup()
print "all done"
Highlight program code (Ctrl+C copy, Ctrl+V paste)

Remarks:
The standard timing of the Morse code relative to the time length dt of a single dot is the following:

 Dot  dt
 Dash  3 * dt
 Pause between dots and dashes in same character  dt
 Pause between characters  3 * dt
 Pause between words: 7 * dt  7 * dt (*)

(*) may be increased for easier reading