![]()
The source code of all examples can be downloaded from here.
|
|
Experiment 1: Use the HC-SR04 ultrasonic distance detector |
|
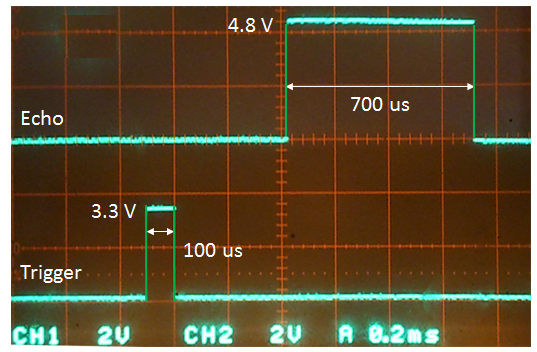
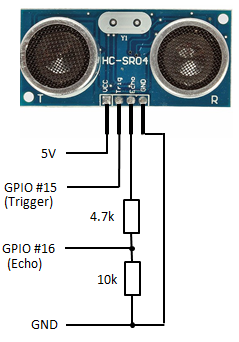
Aim: The HC-SR04 module is simple to use. Apply a positive trigger pulse of about 10-100 us to the Trigger input. After a while the Echo output sends back a positive pulse whose length corresponds to the travel time of the ultrasonic signal. Below the oscilloscope image with the trigger and echo pulses.
Since the speed of sound is 343 m/s, the sound travels 24 cm in 700 us. Because this is the distance from the sensor to the target and back to the sensor, the target is 12 cm away.
Program:[►] # Ultrasonic1.py # Using HC-SR04 ultrasonic module import RPi.GPIO as GPIO import time P_TRIGGER = 15 P_ECHO = 16 def setup(): GPIO.setmode(GPIO.BOARD) GPIO.setup(P_TRIGGER, GPIO.OUT) GPIO.setup(P_ECHO, GPIO.IN) def getDistance(timeoutCount = 10000): # Send max 10 us trigger pulse GPIO.output(P_TRIGGER, GPIO.HIGH) time.sleep(0.00001) GPIO.output(P_TRIGGER, GPIO.LOW) # Wait for HIGH signal count1 = 0 while GPIO.input(P_ECHO) == GPIO.LOW and count1 < timeoutCount: count1 += 1 startTime = time.time() # Wait for LOW signal count2 = 0 while GPIO.input(P_ECHO) == GPIO.HIGH and count2 < timeoutCount: count2 += 1 if count1 == timeoutCount or count2 == timeoutCount: return -1 elapsed = time.time() - startTime distance = 34300 * elapsed / 2.0 # round to 2 decimals distance = int(distance * 100 + 0.5) / 100.0 return distance print "starting..." setup() while True: d = getDistance() print "d =", d time.sleep(0.1) In order to avoid a hanging program when the sensor does not reply, we use a timeout count and getDistance() returns -1. You get a standalone application if you write out the result to an attached Oled or 7-segment display. Program:[►] # Ultrasonic2.py # Show distance on Oled import RPi.GPIO as GPIO import time from OLED1306 import OLED1306 P_ESCAPE = 12 # Button A P_TRIGGER = 15 P_ECHO = 16 def setup(): GPIO.setmode(GPIO.BOARD) GPIO.setup(P_TRIGGER, GPIO.OUT) GPIO.setup(P_ECHO, GPIO.IN) GPIO.setup(P_ESCAPE, GPIO.IN) def getDistance(timeoutCount = 10000): # Send max 10 us trigger pulse GPIO.output(P_TRIGGER, GPIO.HIGH) time.sleep(0.00001) GPIO.output(P_TRIGGER, GPIO.LOW) # Wait for HIGH signal count1 = 0 while GPIO.input(P_ECHO) == GPIO.LOW and count1 < timeoutCount: count1 += 1 startTime = time.time() # Wait for LOW signal count2 = 0 while GPIO.input(P_ECHO) == GPIO.HIGH and count2 < timeoutCount: count2 += 1 if count1 == timeoutCount or count2 == timeoutCount: return -1 elapsed = time.time() - startTime distance = 34300 * elapsed / 2.0 # round to 2 decimals distance = int(distance * 100 + 0.5) / 100.0 return distance print "starting..." oled = OLED1306() oled.setFontSize(50) setup() while GPIO.input(P_ESCAPE) == GPIO.LOW: d = getDistance() oled.setText(str(d)) time.sleep(1) GPIO.cleanup() oled.setText("done") Highlight program code
|
|
|
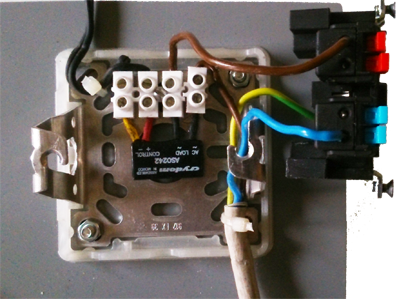
Experiment 2: Relay switching |
|
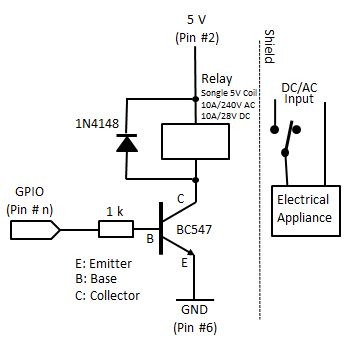
Aim: Caution: Do not use the mains voltage unless you are familiar with high voltage. Be extremely careful to avoid an electric shock hazard. The relay should be part of a fully closed housing, e.g. a power outlet box. Avoid any electric contact between the high voltage and low voltage side. Below an classical example circuit using a bipolar transistor that may be modified by using compatible parts. The diode parallel to the relay coil is needed to protect the transistor from voltage spikes caused by induction when the coil current is switched off.
Remarks:
|
|
|
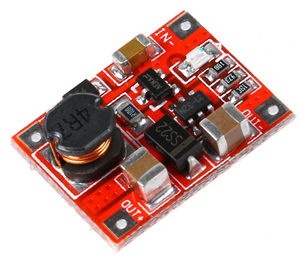
Experiment 3: Step-up Converter 3.3V to 5 V |
|
Aim:
|